I had a project I was working on where I wanted to automate uploading of a CSV file to SharePoint List. Of course with all the security changes and MFA I needed to find a way to do it securely.
That's when I found the following by June: How to Use SharePoint PNP PowerShell Module in Office 365 (adamtheautomator.com)
Using his directions for the Non-Interactive didn't work for me... but it got me on the right track. Know that his directions may work fine and I just didn't do it right :)
I used the following to make this work:
- PowerShell v7
- Visual Studio Code (as replacement for ISE)
- Windows Server 2016 and 2019, also replicated on Windows 10 and 11.
- Create and import SSL Cert
- Register App in Azure AD
- Set app permissions
- Set app certificate
- Connection string for script
Create the self signed certificate. Other options can be used, these are the basics.
New-SelfSignedCertificate -Subject "PowerShell PnP" -CertStoreLocation Cert:\CurrentUser\My
This is going to generate a certificate thumbprint. Copy it into the next part.
Export the certificate as a CER and PFX
Export-Certificate -Cert Cert:\CurrentUser\My\PasteThumbprintHere -Type Cert -FilePath PowerShellPnPM365App.cer
$password = ConvertTo-SecureString -String "UberSecurePasswordHere" -Force -AsPlainText
Export-PfxCertificate -Password $password -Cert Cert:\CurrentUser\My\PasteThumbprintHere -FilePath PowerShellPnPHost.pfx
You now have a CER and PFX file. The CER will be uploaded to Azure AD. The PFX will be installed on the computer doing the automated scripting under the personal certificate store of the user account used for the automation.
Go ahead and login as the account that will be running the scripts. Then install the PFX certificate with the password you chose.
Copy the thumbprint as you'll use that in your script.
Setup Azure AD:
Jump over to your Azure AD admin center and navigate to "Azure Active Directory" and then "App Registrations" then "All applications"
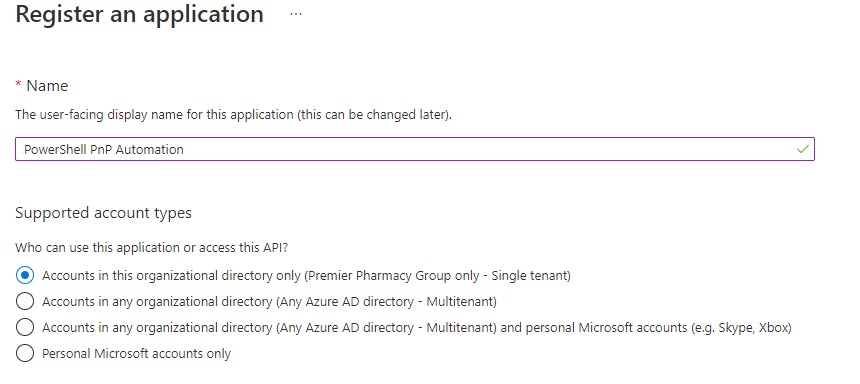
This is going to give you a screen showing your new Application (client) ID and the Directory (tenant) ID. Copy these both down as you'll need them later.

Click on Certificates and Secrets, and then click Certificates
Click upload certificate and select the CER that you created earlier. Notice the thumbprint should match what you had earlier.

Now you can give your app permissions to the area you need. In my case I chose to use API Permissions. Click API Permissions, and then Add a Permission. Choose the area you want to add, in my case it was for a SharePoint list so I picked SharePoint.

I then wanted it to be application permissions as this was for automation.

Here you can choose to give access to Full Site control, or you can narrow it down further. I wanted to be somewhat granular in this case so I chose "Sites.Selected".

We now show the Sites.Selected, but notice the "Not Granted". I then click the "Grant admin consent for ...." to grant permission.

Let's hop back over to a PowerShell 7 window that has the PnP Module installed.
Connect-PnPOnline -Url "https:contoso.sharepoint.com/sites/mysite" -PnPManagementShell
You should be given a code to copy, and a link to a web browser login page. Open it and login with Global admin to give consent.
Grant-PnPAzureAdAppSitePermission -AppID "Application(Client)ID Here" -DisplayName 'PowerShell PnP Automation' -Site "https://contoso.sharepoint.com/sites/mysite" -permissions Write
You can double check using
Get-PnPAzureADappSitePermission

Now we can test that all works for our script!
$SiteUrl = "https://contoso.sharepoint.com/sites/yoursite"
Connect-PnPOnline $SiteUrl -ClientId 'YourClientID" -Tenant 'contoso.onmicrosoft.com' -Thumbprint 'YourCertificatesThumbprint'
Get-PnPList
You should see your sites Lists.
Happy Automating!

No comments:
Post a Comment